How to Find Your Face Shape: 7 Types and Easy Measurements
A practical guide to measuring your face, comparing common shape patterns, and avoiding photo angles that make a face look wider or longer.

What Does Face Shape Actually Describe?
Face shape is a shorthand for the outer contour of the face: how the forehead, cheekbones, jaw, and chin relate to the overall length and width. It is not a measurement of attractiveness, health, personality, or facial harmony. The same person can appear to have a different shape when hair covers the temples, a camera is held too close, or the head is turned.
The labels are most useful for practical decisions such as choosing a glasses frame, planning a haircut, or describing a portrait reference. They work best as a flexible visual vocabulary. Instead of asking which shape is the perfect one, ask which contour is most visible in a standardized photo and which measurements explain that contour.
Use the label as a description
A face shape is a useful pattern, not a permanent identity. If your measurements sit between oval and oblong, or between heart and diamond, that overlap is normal and often more informative than forcing one category.
How to Find Your Face Shape at Home
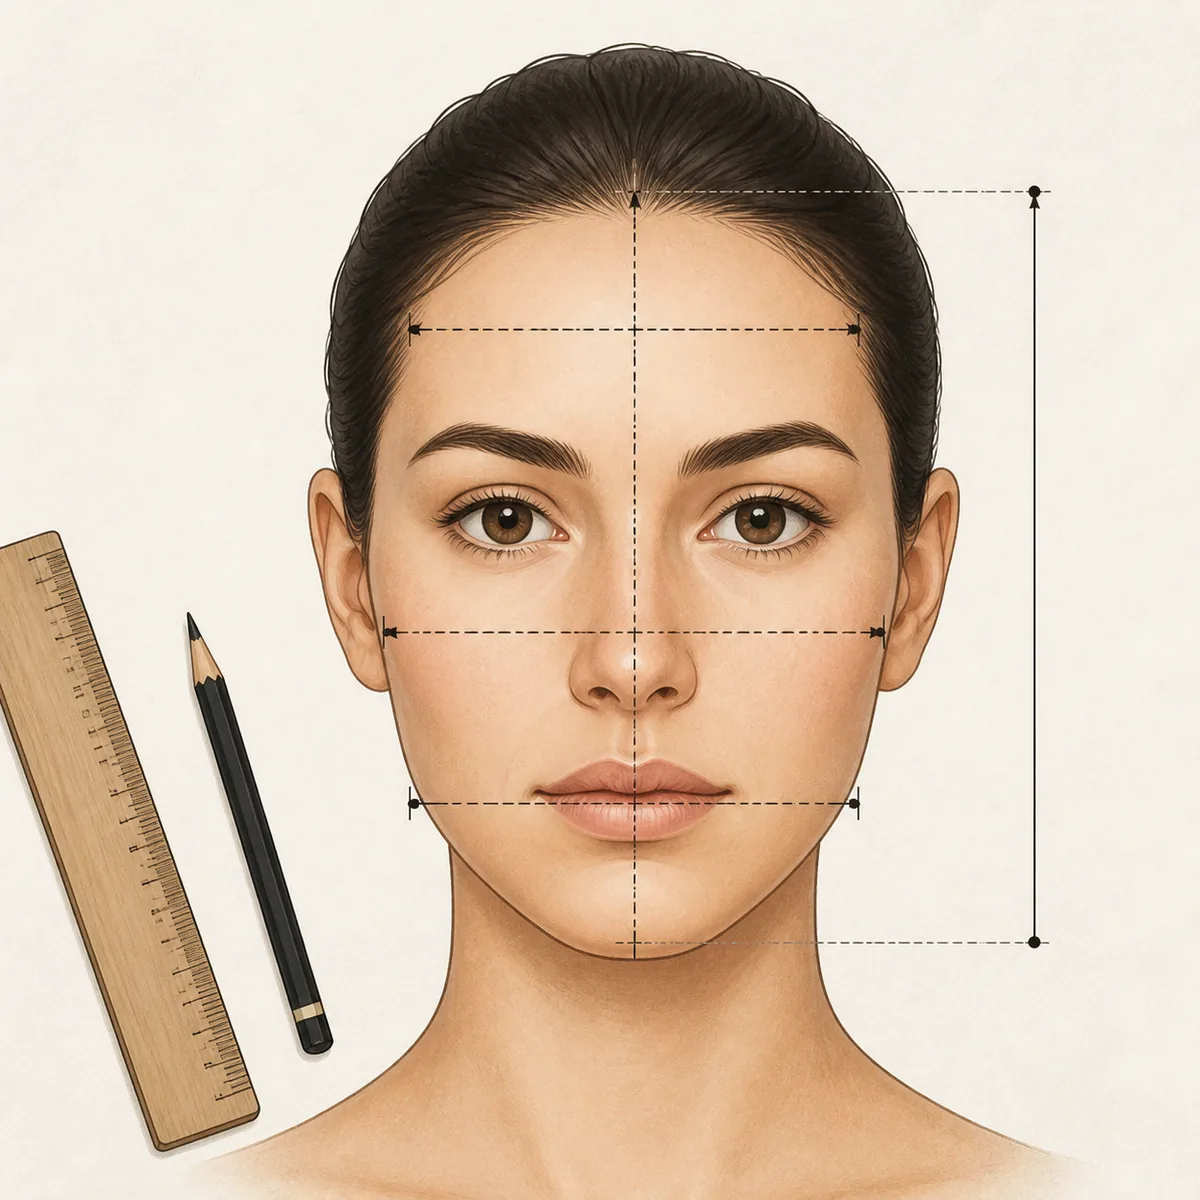
You can measure your face with a soft tape measure, a ruler, or a clear photo and a simple image editor. The goal is consistency: use the same landmark definitions for every measurement and write the numbers down before interpreting them.
- Prepare the view: Pull hair away from the forehead and cheeks. Stand or sit upright, keep the chin level, relax the jaw, and look straight at the camera. Avoid a wide smile because it changes the cheek and jaw outline.
- Measure face length: Measure from the center of the hairline to the lowest point of the chin. If your hairline is difficult to see, use the upper forehead contour in a photo and mark that assumption; do not compare it with a measurement taken from the eyebrows.
- Measure the cheekbones: Find the widest points across the upper cheeks, usually near the outer corners of the eyes. Measure in a straight line from one cheekbone to the other, not along the curved surface of the face.
- Measure the forehead: Use the widest horizontal span across the forehead, often between the temples. Hair volume can hide this width, so a pulled-back photo is more useful than a styled selfie.
- Estimate jaw width: Measure from the angle of one jaw to the other, or measure one side from the jaw angle to the chin and double it. This is the least repeatable measurement, so record how you defined the points.
- Compare the pattern: Look at the widest area, the relative face length, and whether the jaw tapers, stays straight, or appears rounded. The pattern across all four measurements matters more than a small difference between two numbers.
| Measurement | Where to measure | What it helps you compare |
|---|---|---|
| Face length | Hairline center to chin | Overall length compared with width |
| Cheekbone width | Widest point across upper cheeks | Whether the middle face is the widest area |
| Forehead width | Widest span between the temples | Whether the upper face is broad or narrow |
| Jaw width | Jaw angle to jaw angle, or one side doubled | Whether the lower face is broad, straight, rounded, or tapered |
Do not treat the measurements as a medical or scientific diagnosis. They are a practical way to make a visual comparison more repeatable. If two people measure the same photo with slightly different landmark choices, their results can differ even when both followed the method carefully.
Seven Common Face-Shape Patterns
The following descriptions are visual starting points. Real faces are three-dimensional, and a single label cannot capture the width of the brow, cheekbones, jaw, chin projection, or soft-tissue contour. Use the table to form a hypothesis, then check it against your photo and measurements.
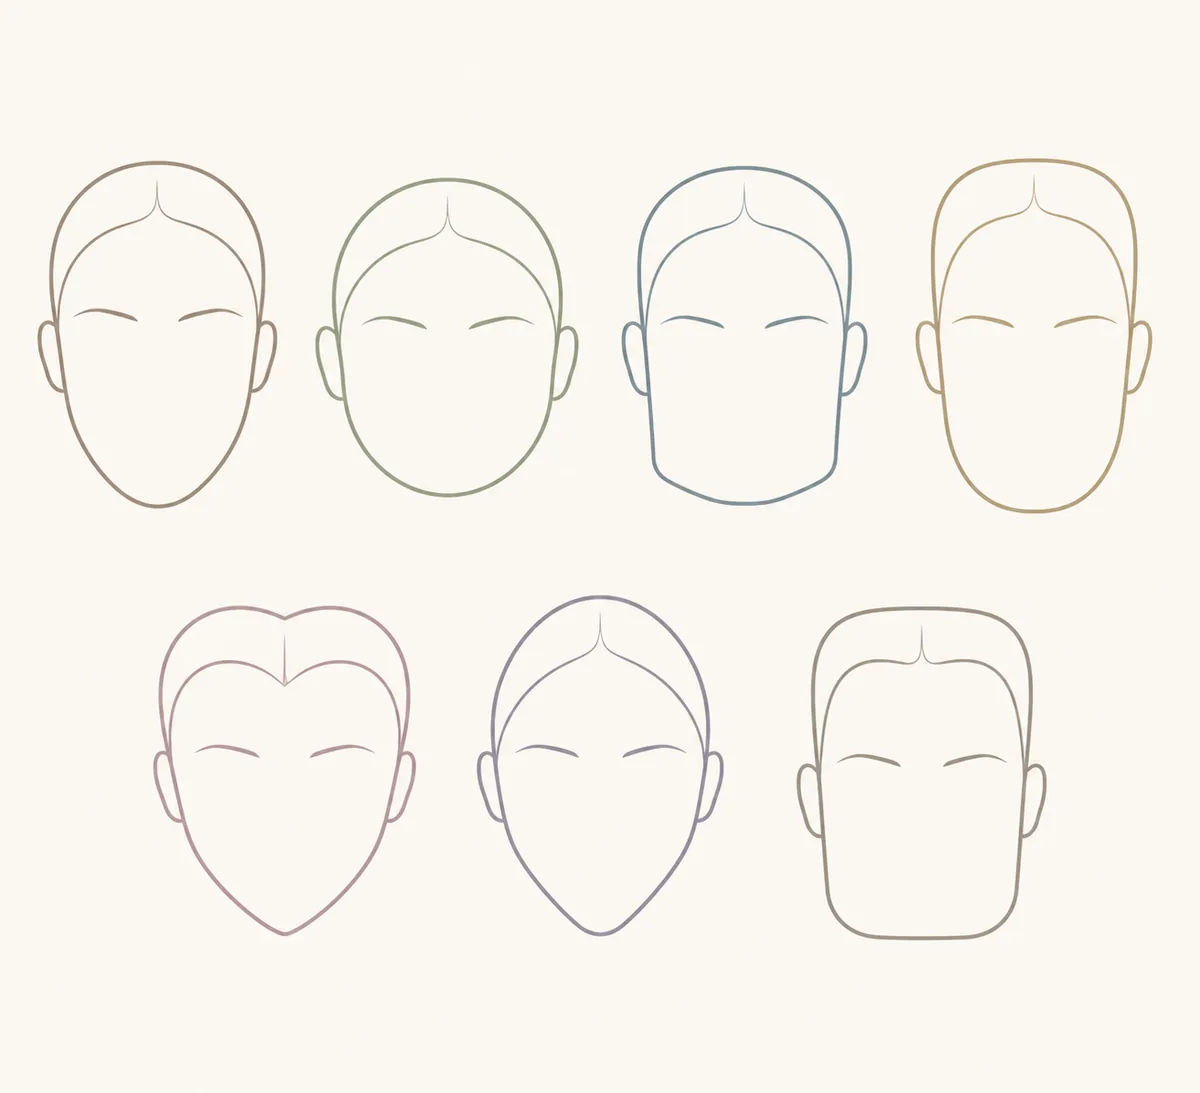
| Pattern | Typical contour clue | Useful check |
|---|---|---|
| Oval | Longer than wide with a soft taper | Compare jaw taper with face length |
| Round | Similar length and width with curved cheeks | Check for close-camera distortion |
| Square | More aligned widths and a defined jaw | Relax the jaw before judging angles |
| Oblong | Clearly elongated with relatively straight sides | Compare with oval from the jaw downward |
| Heart | Broader upper face and narrower chin | Check forehead width and chin taper |
| Diamond | Cheekbones widest, forehead and jaw narrower | Confirm cheekbone width from a front view |
| Rectangle | Long face with aligned, structured sides | Compare with oblong and square together |
Oval
The face is usually longer than it is wide, the cheekbones are gently prominent, and the forehead is somewhat wider than the jaw. The chin tends to taper softly rather than ending in a sharp point.
Round
The face length and width look relatively close, with fuller cheeks and a softly curved jaw. A round appearance can be exaggerated by a close camera, a wide lens, or hair that stops at the cheekbones.
Square
The forehead, cheekbones, and jaw can appear similar in width, while the jaw angle looks more defined or straight. Muscle tension and lighting can make the lower face look more angular than it is.
Oblong
The face is noticeably longer than it is wide, with relatively straight sides or a longer lower section. Oblong and oval often overlap, so compare the jaw shape and side contour instead of relying only on length.
Heart
The forehead or upper face is broader, the cheekbones may be visible, and the jaw narrows toward a smaller chin. A widow's peak is sometimes present but it is not required for this pattern.
Diamond
The cheekbones are often the widest area, while the forehead and jaw appear narrower. A pointed or tapered chin can be part of the pattern, but the cheekbone relationship is usually the more useful clue.
Rectangle
The face is longer, with forehead, cheekbone, and jaw widths that stay comparatively aligned. The contour may look more structured than an oval, but many people sit between rectangle and oblong.
These categories overlap on purpose. The most helpful result may be a phrase such as “mostly oval with an oblong tendency” or “diamond-like through the cheekbones.” That description gives you more information than a forced yes-or-no label.
Photo Tips for a More Reliable Face-Shape Result
If you are using a selfie or an AI face shape analyzer, standardize the photo before interpreting the result. A face photographed from too close can look wider in the center, while a tilted head can make one side of the jaw appear longer.
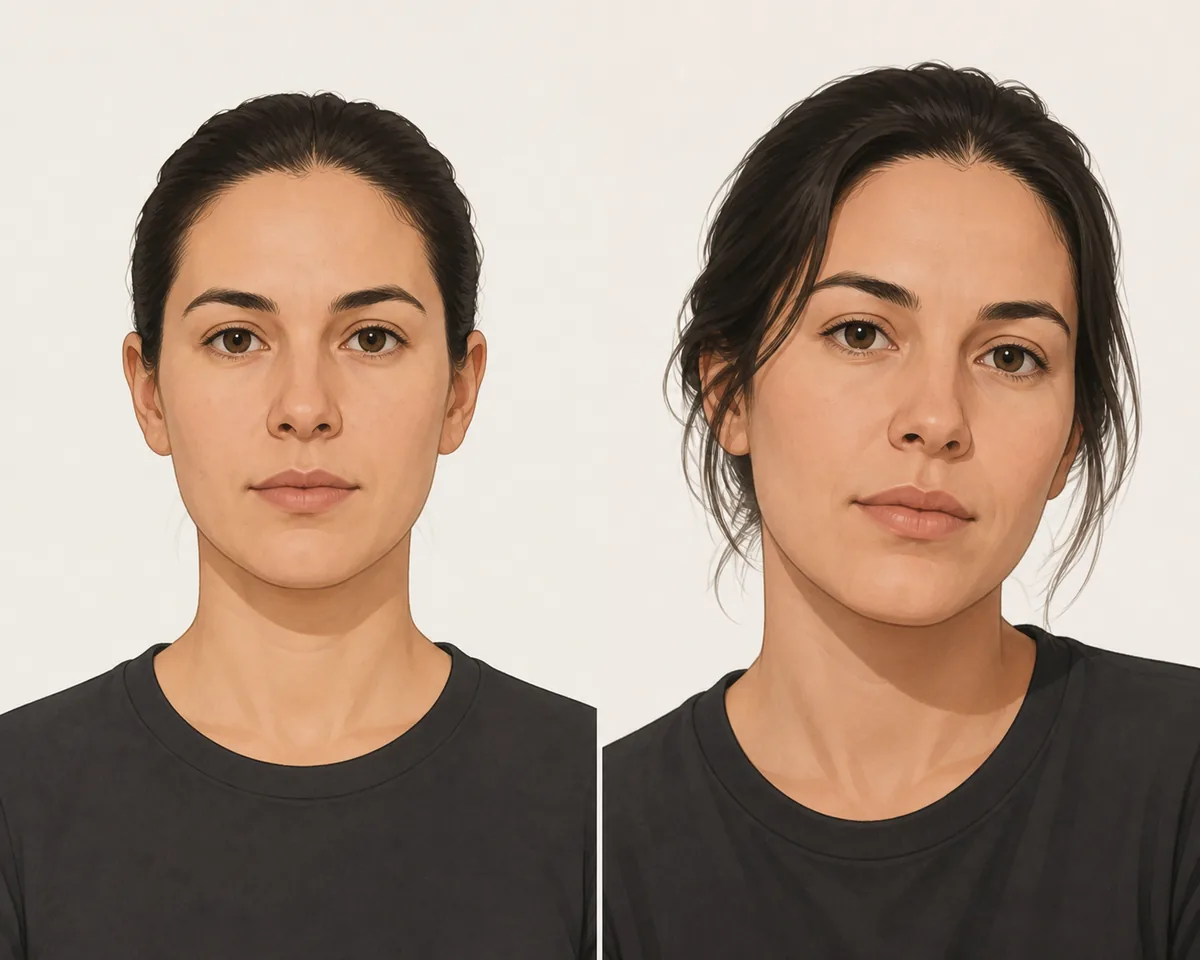
- Use even light: Choose soft light that reaches both sides of the face. Strong side shadows can hide one cheekbone and make the jaw look sharper.
- Keep the camera at eye level: Place the lens near the center of the face and keep the phone far enough away to reduce wide-angle distortion. Crop later instead of moving the camera very close.
- Keep the head neutral: Look straight ahead with the chin neither lifted nor tucked. A three-quarter view is useful for studying structure, but it is not a fair replacement for a front view when measuring width.
- Move hair away: Expose the temples, cheeks, and jawline. Bangs, a ponytail pulled forward, or heavy side volume can change the outline you are trying to classify.
- Repeat once: Take a second photo under similar conditions. If the label changes, compare the images for lighting and angle differences before deciding that the measurement method failed.
An image-based result is an estimate of the visible photo. It cannot recover the contour hidden by hair, lighting, expression, or perspective. Keep the photo conditions consistent when comparing results over time.
What If Two Face Shapes Seem to Fit?
Mixed results are common because face shape is a continuum, while the labels are discrete. A long oval may look oblong in a neutral photo; a heart-shaped contour may look diamond-like when the cheekbones are prominent; a square jaw may look rounder when the expression is relaxed.
Start by asking which measurement is creating the disagreement. If the face length is clearly greater than the width but the jaw is soft, oval and oblong are both reasonable descriptions. If the cheekbones are widest but the forehead is also broad, heart and diamond may overlap. Write the two candidates down instead of choosing whichever label sounds more flattering.
Next, compare the contour in a standardized front-facing image and a natural three-quarter image. The front view is better for width measurements; the three-quarter view can reveal whether the jaw taper is real or mostly caused by lighting. You are looking for a stable pattern across views, not a perfect match to an illustration.
A blended answer can be the accurate answer
“Oval with a slightly square jaw” or “diamond through the cheekbones with a tapered chin” is often more useful than a single label. Face shape guides describe tendencies, not strict boxes.
A Simple Way to Confirm Your Result
Once you have a likely shape, confirm it with a short repeatable check rather than searching for a more flattering category. Use the same photo setup, write the four measurements down, and compare your notes with the contour descriptions above.
- Mark the widest area: Decide whether the forehead, cheekbones, or jaw is visibly widest. This immediately separates several common patterns.
- Check length against width: Ask whether the face looks only slightly longer than wide or clearly elongated. This helps separate round, oval, oblong, and rectangle-like contours.
- Look at the chin and jaw: Note whether the lower face is rounded, straight, broad, or sharply tapered. Do not use chin shape alone; combine it with the upper-face width.
- Name the overlap: If two patterns remain plausible, keep both in your description and use the measurement that created the overlap as the next thing to verify.
If you prefer an automated starting point, a face shape detector can estimate the visible pattern from a photo. Treat the output as a convenience and compare it with the manual notes, because an automated label inherits the same lighting, angle, hair, and landmark limitations.
Face Shape vs Facial Proportions
Face shape describes the outer contour. Facial proportions describe relationships inside that contour, such as vertical facial thirds, eye spacing, nose width, mouth width, or face length-to-width ratio. Two people can share an oval outline but have very different internal proportions, and a face-shape label cannot explain those differences.
If your question is about how the eyes, nose, mouth, jaw, and symmetry relate to one another, use a facial proportions or harmony resource instead of treating face shape as the complete answer. The distinction keeps a simple contour label from turning into an exaggerated beauty score.
Face Shape FAQ
Further reading
- A measurement-based overview of face-shape categories: Omni Calculator face shape guide
- A practical guide to comparing forehead, cheekbones, jaw, and length: Real Simple face-shape guide
- Photo and contour considerations for common face shapes: InStyle face-shape guide
Last updated: August 7, 2026