How to Measure Facial Thirds Correctly
A clear guide to the upper, middle, and lower thirds, the landmarks behind the ratio, photo setup, and responsible interpretation.

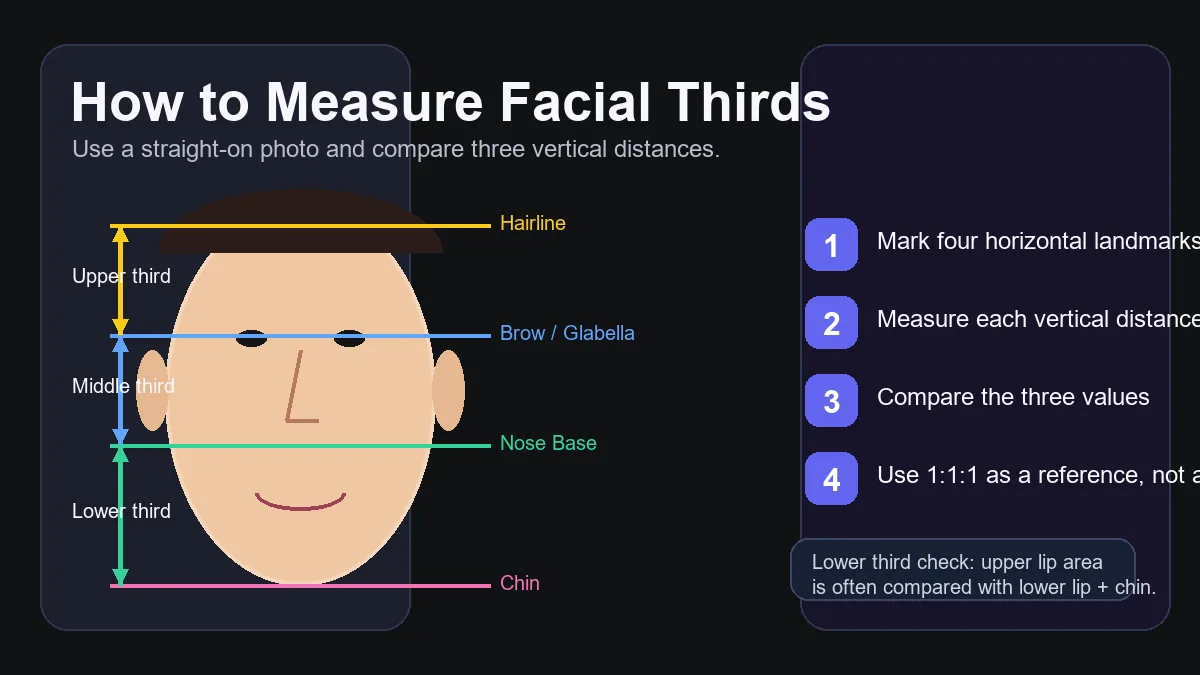
Facial thirds divide visible face height into upper, middle, and lower sections. The diagram is a measurement aid, not a beauty verdict.
Table of Contents
What Do Facial Thirds Mean?
Facial thirds are a way to describe vertical face proportions. Imagine a straight line running from the visible hairline to the bottom of the chin. Two horizontal landmarks divide that line into three stacked sections: the upper third from hairline to brow, the middle third from brow to the base of the nose, and the lower third from the nose base to the chin. Artists, orthodontic researchers, dentists, and photo-analysis tools use this vocabulary because it turns a vague impression such as a long midface into a comparison that can be checked.
The classic reference is 1:1:1, meaning the three distances are close in height. It comes from drawing and anthropometric canons, but it is not a rule that every face must meet. Hairline shape, age, expression, ancestry, camera height, and the point selected for each landmark all change a measurement. A useful facial thirds guide therefore describes a pattern, explains uncertainty, and avoids converting one ratio into an attractiveness or health judgment.
The boundary that matters
The existing How to Measure Facial Thirds tutorial focuses on placing lines step by step. This guide adds the missing context: what the three sections represent, why two photos disagree, and how to read a result without treating 1:1:1 as a score.
In clinical or research settings, names such as trichion, glabella, subnasale, and menton make the landmarks more precise. A casual photo guide can use plain language, but the same principle applies: measure the visible face from comparable points, not from the top of the hairstyle or the edge of a crop.
If the hairline is covered, mark the best visible estimate and label the upper third as lower confidence. The brow line and nose base are usually easier to repeat, while the chin point can shift with a lifted or lowered head.
A 1:1:1 reference means each section would represent about one third of the measured height. It does not mean that a small difference is a defect. In a real photo, a range such as 31% / 33% / 36% can still read as broadly balanced, especially when the same pattern is not repeated across other images.
The Four Landmarks and the 1:1:1 Reference
The arithmetic is simple; landmark choice is where most variation enters. Use the same anatomical idea each time, and record when a point is hidden or estimated.
| Landmark | Where to mark it | What it separates |
|---|---|---|
| Hairline / trichion | Visible central hairline or a clearly labeled estimate | Starts the upper third; hidden hair lowers confidence |
| Brow / glabella | The brow region or point between the eyebrows | Separates the upper and middle thirds |
| Nose base / subnasale | Where the base of the nose meets the upper-lip area | Separates the middle and lower thirds |
| Chin / menton | Lowest visible point of the chin | Ends the lower third measurement |
How to Measure Facial Thirds Correctly
You can measure with a ruler on a printed photo, a phone markup tool, or an image editor. Work from a neutral, front-facing image first; use a calculator only after you understand which points it is using.
- Choose a comparable photo: Use even light, a neutral expression, a level camera at eye height, and enough space around the hairline and chin. Avoid a close wide-angle selfie because lens distance changes apparent proportions.
- Mark the hairline: Place the first line at the visible central hairline or the best estimate of the trichion. Do not start at the crown, the top of the hairstyle, or a cropped image edge.
- Mark the brow line: Use the glabella or a consistent brow reference. Keep the line horizontal. Eyebrow makeup can obscure the landmark, so note when you are estimating rather than seeing the skin directly.
- Mark the nose base: Place the next line at the subnasale, where the base of the nose meets the upper-lip area. This separates the middle third from the lower third.
- Mark the chin point: Use the lowest visible point of the chin, often called the menton. A lifted head can shorten the lower third in the image, while a lowered head can make it appear longer.
- Calculate and record: Measure the three vertical distances with the same unit. You can write them as a raw ratio such as 92:98:105 or divide each by the total to get percentages. Save the photo angle and landmark notes with the result.
Repeatability beats a perfect ruler
Measure two or three neutral photos taken at the same distance before drawing a conclusion. If the ratio changes substantially, the image setup is part of the result. A consistent method with a stated uncertainty is more useful than a precise number from a distorted photo.
How to Read a Facial Thirds Ratio
Start by naming the pattern, then check whether it survives a change of photo. A close ratio can be described as relatively balanced; a larger difference tells you which vertical area dominates the frame. Neither description is a diagnosis or a ranking.
| Observed pattern | What it describes | What to check next |
|---|---|---|
| 31% / 33% / 36% | Three sections are close; the lower third is slightly longer | Repeat with a level camera before calling it a stable pattern |
| Upper third clearly longer | The forehead or visible hairline-to-brow distance dominates | Check hairline estimate, hair volume, crop, and camera height |
| Middle third clearly longer | The brow-to-nose-base section reads as a longer midface | Compare neutral photos and keep the brow and nose landmarks consistent |
| Lower third clearly longer | The nose-base-to-chin section occupies more vertical height | Review head pitch and, if useful, split the lower third at the lips |
| Ratios change from photo to photo | The image conditions are affecting the measurement | Use matching distance, light, expression, and lens setup |
A practical note: percentages are easier to compare across different image sizes. If the three sections total 300 pixels, measurements of 94, 101, and 105 pixels become 31.3%, 33.7%, and 35.0%. The small spread is more informative than the label equal or unequal.
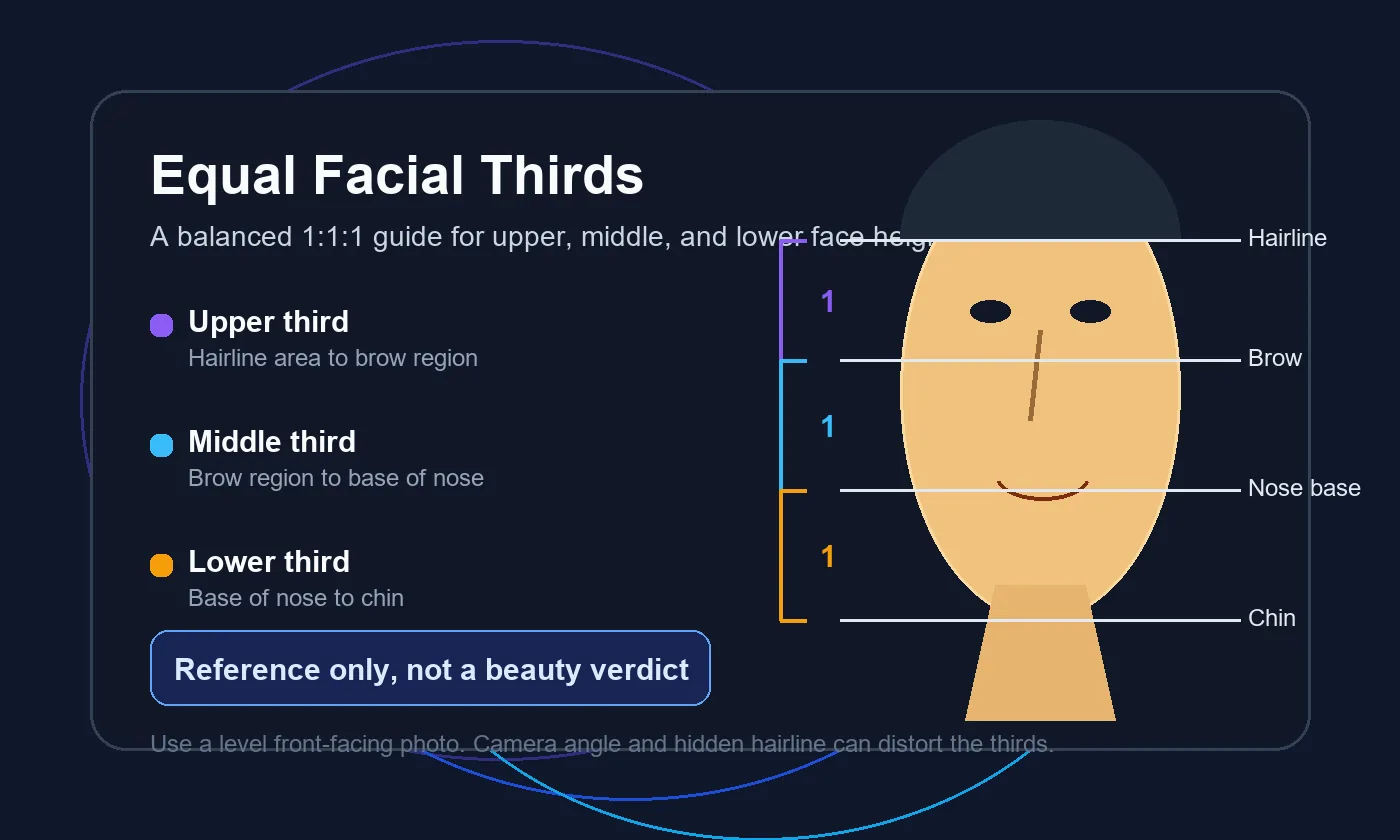
For example, 1:1.03:1.08 suggests three similar sections, while 1:1.18:1.35 suggests a longer lower third. Before treating the second pattern as a feature of the face, repeat the measurement with a level camera and a visible hairline. If the lower third remains longer, you can describe that proportion and explore the lip-to-chin split for more context. Do not turn the ratio into a promise about attractiveness, age, personality, or health.
Why Photos and Facial Thirds Tests Disagree
Most disagreements come from the image or the landmark definition, not from the division itself. Check these causes before deciding that a tool is wrong.
- Starting at the wrong top point: The top of the skull or hair volume is not the facial hairline. A hidden or receding hairline also makes the upper estimate less certain.
- Using different head pitches: Looking up or down changes the apparent distance from brow to chin. Keep the camera and head level when comparing photos.
- Changing lens distance: A phone held close with a wide lens can enlarge nearby features and alter the visual balance. Step back and crop instead of placing the lens against the face.
- Measuring a moving expression: Smiling, pursing the lips, or clenching the jaw moves landmarks. Use a relaxed expression for the baseline, then treat expressive photos as a separate case.
- Mixing landmark definitions: One measurement may use the brow ridge and another the eyebrow hairs. Write down the chosen points so the comparison is reproducible.
- Expecting one exact answer: A manual ruler, an AI model, and a beauty app may estimate different points. The right question is whether the broad pattern is stable and clearly explained.
Manual Measurement, AI Tools, and Responsible Limits
Manual measurement teaches the framework. You see which landmark is uncertain, can correct a tilted photo, and can explain where a ratio came from. Its weakness is human placement: a one- or two-pixel shift matters on a small image, and different people may choose slightly different brow or hairline points. Manual results should therefore include the photo conditions and a reasonable tolerance rather than false precision.
An AI facial thirds test can detect landmarks and return percentages faster. It is still dependent on the same visual evidence: blur, shadows, hair, glasses, head angle, and lens distortion can move the estimate. Use a clear front-facing image, read the tool's notes, and compare the output with a simple manual check. The Facial Thirds Calculator on this site is an optional educational shortcut; it does not diagnose, certify beauty, verify identity, or replace professional assessment.
A face photo is personal data. Before uploading, check whether the service stores images, uses them for training, offers deletion, and explains third-party processing. Avoid uploading another person's photo without permission, and do not use a facial-thirds result for medical, employment, legal, or other high-stakes decisions.
How to Review a Facial Thirds Measurement
A useful measurement is repeatable, transparent about uncertainty, and connected to the same photo conditions. Use the checklist below before drawing a strong conclusion.
Start by saving the original photo and a copy with your four landmarks visible. The original lets you check whether a crop, filter, hairstyle, or perspective correction changed the apparent distances. Measure the same image twice rather than comparing a selfie with a studio portrait. If the numbers move by a few pixels when you redraw a line, record a range instead of pretending that one decimal is exact.
A second photo is a useful stability check. Choose a neutral expression, eye-level camera, and similar distance, then repeat the same landmark choices. When the upper, middle, or lower section appears longer in both images, that pattern is more credible than a result from one tilted frame. When the pattern changes, the camera angle or landmark uncertainty may be larger than the facial difference you are trying to describe.
Interpret the ratio as a description of vertical layout, not a score for a person. A longer lower third can reflect the visible chin, lip posture, lens distance, or head position. A hidden hairline makes the upper third an estimate. Explain the observation, the source of uncertainty, and what another photo could clarify. This keeps the guide useful without turning a simple proportion into a universal beauty rule.
- Check the frame: Confirm that the head is level, the camera is near eye height, and the full hairline and chin are visible.
- Keep landmarks consistent: Use the same brow or glabella reference and the same chin endpoint every time you repeat the measurement.
- Record a range: If a landmark is hidden or shifts by a few pixels, write an approximate range and mark the section as lower confidence.
- Compare a second photo: A similar neutral front-facing photo can show whether the pattern is stable or caused by perspective and expression.
- Stop at description: Use the result to describe proportion and photo conditions, never to claim a medical, moral, or universal attractiveness judgment.
The best answer to how to measure facial thirds is therefore a careful process: mark comparable landmarks, calculate a simple ratio, repeat it under similar conditions, and state what the image cannot prove.
How to Measure Facial Thirds FAQ
References and Further Reading
- A peer-reviewed study describes facial thirds as a neoclassical vertical canon and discusses why facial proportions vary across real populations. NCBI / PubMed Central
- For a hands-on landmark walkthrough, see the site's step-by-step article. How to Measure Facial Thirds
- For a calculator-based cross-check, use the site's photo tool after reviewing the input and privacy notes. Facial Thirds Calculator
Last updated: November 16, 2026